Mask Making
from Earth Day in Your School and Community © 1993 published by Heartland All Species Project, Kansas City, Missouri USA
Designing the Mask
To make a good mask of your creature, it's important to take some time to make a plan. The plaster face mask is often just the base, to which we add ears, horns, beaks, and noses. Compare your face shape to that of your animal. In many cases, it is easier to make a mask by using a headdress or hat mask which can be easily shaped to resemble your animal. Younger children often enjoy the simplest of colored paper or plaster masks. Consider the abilities of the student and the time available when choosing a mask type from the following:
- Plaster cast tape face masks-
- recommended for 3rd grade & older
- requires approximately three class sessions.
- Wire frame headdresses
- Cardboard frame headdresses
- Paper masks and headpieces
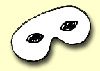
Plaster Cast Tape
Plaster cast tape is a good material for making a beautiful, strong mask. Working in pairs, students can make the base shell of the mask for both partners in under an hour. Plaster cast tape may be purchased from a medical or educational supply house. One roll of cast tape should easily make a mask.
Materials
|
|
|
|
|
|
|
|
|
|
|
Procedure
Cut the cast tape into strips of about 1 x 4 inches, depending on the material you purchase. Cutting a variety of sizes can be helpful. Keep the strips out of range of spilling or dripping water, as wet tape will harden before you apply it to the face, making it useless.
Smear a coat of petroleum jelly all over the face area to be covered by the mask, concentrating on the eyebrows and hairline. When the plaster hardens, any hair stuck in it will pull out.
Dip the strips into the warm water, just long enough to get them wet, and begin applying them to the face. Notice the difference between the sides of the tape. One side has more plaster on it. Apply the tape with this side out, and rub the tape until all extra plaster is spread around, covering the cotton cloth of the tape and all the holes .
Using the diagram at right, outline the perimeter of the mask neatly, generously overlapping each piece for strength. At this time the "patient" must keep very still; no laughing or moving the face for 10-15 minutes. Cover the entire area with three layers of the tape, repeating the initial pattern.
Make the mask strong in narrow places like down the bridge of the nose. For most animals, the eyes should be circles symmetrically placed on the face. don't worry about snouts, horns, or ears at this time. Details can be added later.
After ten to fifteen minutes, the mask can be removed. By tilting the head forward and scrunching up the face, the mask may be loosened. In some cases, you may have to gently work the mask off the face. Use some loosely wadded newspaper to support the mask while it dries. Set aside for 24 hours to dry.
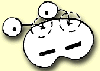
Noses, Beaks and Ears
Dozens of materials can be used to make these features. The most accurate features are made by using a template or pattern. Using a piece of scrap paper, cut a piece for the nose or ear. don't forget to leave tabs for attaching the piece to the mask. Now test fit this piece to the mask. When you make a design you like, cut a final version from heavy paper or screen wire. You can use a stapler or a new layer of cast tape to bind the new parts to the mask.
Materials that work well include paper towel or toilet paper rolls, yogurt containers, balloons, wads of paper towel. These can be formed into a muzzle for a dog or cat.
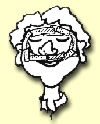
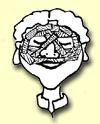
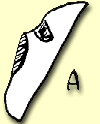
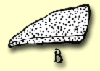
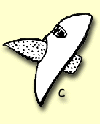
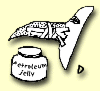
Sculpted Clay Forms for Snouts
- Begin with the plaster mask, leaving the nose and mouth open
(Figure A).
- Sculpt from clay the snout of the animal of your choice (Figure B).
- Insert it from behind into the plaster mask (Figure C).
- Rub petroleum jelly on the clay snout and cover the snout with several layers of plaster tape, attaching it to the face of the mask. Allow to dry one-half hour (Figure D).
Dig out clay from behind the mask. You may have to cut away parts of the original mask. Do not allow the clay to dry in place, or your mask will be too heavy to wear.
Allow the mask to dry 24 hours before painting.
Covering the Forehead
In some cases, you will need to extend the mask over the forehead to accurately place the ears; e.g., on a cat's head. Cover the hair with plastic and tape or tie it in place. Put on the original mask and add on to the mask up the forehead and as far back as needed. Let the mask dry and remove from face. Let cure 24 hours.
Decorating the Mask
The mask may look rough when you're finished, so you can smooth it by applying a coat of 1/2 Acrylic Gel Medium and 1/2 Acrylic Modeling Paste (you may add paint directly to this combination).
To paint a mask without using the smoothing technique above, seal the mask with a paint primer or Gesso (available from an art store). After the primer, the finish coat should be applied to attain the proper skin color mix of the chosen species. Here is where the creative urge can run wild.
Decorating Suggestions
- Embed shells and beads in 100% modeling paste.
- For a lion's mane, latch hook a wig.
- Use hot glue for attaching wool, other hair, or feathers.
- Embed lace in mixture of paint and 1/2 gel, 1/2 paste
- Use theatrical materials like makeup, wigs and hair
- Use broom strands for whiskers.
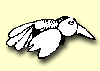
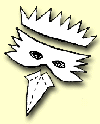
Wire Frame Headdresses
Tools
|
|
|
|
|
|
Materials
|
|
|
|
|
|
|
|
|
|
|
Procedure
Find a good clear picture of the animal showing as much detail as possible. Other views, from as many angles as possible, can be helpful.
Choose an adjustable cap, two to three sizes larger than your head size. Cut a piece of chicken or screen wire into a square about three times the size of your baseball cap.
At this point, you must decide if you wish to use the bill of the cap or not. It can be helpful to use all or part of the bill. You may wish to cut it into a particular shape, such as a wedge to form a bird's beak. You may use the whole bill to form or support a snout or jawbone. If the bill will help to form the basic head shape of your critter, leave it intact. If it is not necessary, cut it off. Remember, if you cut it off, do not cut too close to the cap or you will destroy the cap's structure. Cut into the bill, not into the stitching or headband. Reinforce the rim with duct tape after altering the bill.
Next, place the cap over something to approximate the way it sits on your head. Use your knee or a wig dummy or anything else that you feel comfortable working with while you form the wire to the hat.
Design a template to help form the wire. Concentrate on the basic shape and not the details. Cut and mold the wire down over the hat, cutting off the excess wire as you go. With chicken wire, tabs or wire strands will be left from each cut. Use these strands to join the frame together and attach it to the hat. When using screen wire, use fine wire for ties, or staple the wire at joints and folds.
After you have created the basic cap structure, the next step is to add the features (see Noses, Beaks and Ears on page 11). Attach these pieces to the finished skull using the wire strands or tabs created when cutting the wire.
Covering the Wire: Some Options
Adhesive Tape
Cut duct tape into small strips, and start covering the wire. Do not worry about creating a smooth surface. Texturing helps in achieving the final visual effect. While you apply the duct tape use it to form the smaller details, such as eyebrows, eyelids, ear folds, and skin creases. Since most paints do not adhere well to duct tape, cover the duct tape with a layer of masking tape; it bonds well to the duct tape and will paint more easily.
Newspaper Mache
Use strips of newspaper dipped in wallpaper paste to form a paper mache-type base. This can be painted easily, once it dries. The problem with this method is the long drying time. Since you will be using built-up layers of newspaper, it will take several hours (generally overnight) to dry.
Plaster Cast Tape
This material can be left in large pieces when covering a large area and so will take less time to apply. Although it dries much faster than newspaper mache, the finished product will weigh considerably more. If the headdress is small, this may not be a problem.
Cloth Mache
For a strong, light covering, nothing beats cloth mache. Use strips of old sheets to cover the framework as before, but dip the strips in a paste that is 1/4 to 1/3 white or carpenter's-type glue. Make a base of flour or wallpaper paste; then add the glue. The material will shrink as it dries. Use two to three layers for durability.
Cardboard Frame Headdresses
Cardboard frame headdresses are similar to the wire frame headdresses above. Strips of bristol or cardboard form the sub-frame. First cut strips of the material. Cut an assortment of widths from 1/2 inch to 2 inches. Start with a "hat band," hold it in place, and staple it at the right size. Turn the stapler so the sharp, folded-over parts of the staples point away from the head. Use a jaw or pinch stapler, or even a regular classroom stapler. Build the sub-frame by attaching cardboard strips to the headband. Form the main lines first and then continue until the smaller features are finished (see illustration). Choose a method of covering the cardboard strip headdress from the options listed in Covering the Wire, above.
Paper masks are not as durable as plaster, but they take less time to create, cost less, and still offer myriad opportunities for individual creativity. Paper is usually a more appropriate medium than plaster for very young children, but even adults can have great fun turning paper into an "animal"!
Materials
|
|
|
|
|
|
|
|
|
|
Procedure
The level of your guidance will depend on student age and creativity. you'll need to decide whether you want to create several specific patterns, and then let the students individualize the masks through decoration, or whether you want to give them a pattern to function as a base. With older students, a base mask and a group discussion of some possible adaptations may be enough.
A word of caution about patterns: Be sure to create patterns to fit a child the age of the students with whom you'll be working. If you make patterns to fit your own face, you may find the eye holes are too far apart, and the whole mask is too big for smaller faces. Some pieces, like beaks, need to be folded to add three-dimensionality to the mask. To add a piece like that, you'll need to create tabs to fold under the mask so you can staple it on easily.

Make your pattern on a medium weight, stiff cardboard. Students will be handling it a lot and tracing around it. Explain which pieces go together ("these ears and some paper whiskers make it a rainforest cat... these eyes turn it into a frog... this top piece and beak turn it into a tropical bird!"). Explain that they need to trace the pieces they want, including the eye holes, but let them know that you will cut the eye holes for them with your VERY DANGEROUS X-ACTO BLADE that only you, the teacher, are allowed to use. It is difficult to poke scissors through poster board to cut the eye holes, and the children could get hurt or could mutilate the mask trying to do so. You can lay the base mask flat (before it's stapled to other pieces) on a cutting surface and cut out the eye holes with your blade.
The mask paper can be a colored paper (remember, lightweight poster board is best) or you can rely on the crayons or markers for color. Let the students trace the pattern pieces onto their paper, cut them out, and decorate them as they see fit. When they've finished, you can begin to assemble the pieces into a mask with stapler, hole punch and yarn. If you're working with older students, they can do this, with minimal help from you. With younger students, you may want to handle the assembly yourself. If so, let each child approve your work as you go ("Okay, should the ears go here, like this?... or do you want them farther apart, like this?").
At this point, you may need to be the expert on how to make paper curl for eyelashes, how to create whiskers, how to fold beaks, what colors frogs can and cannot be (answer: frogs can be any color, of course). Finally, punch a hole on each side of the mask, parallel to the eye holes. Thread a piece of yarn through each hole and tie a knot (staples don't hold yarn well). These yarn pieces can be tied behind the child's head to hold on the mask.
More options and adaptations:
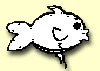
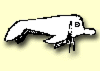
Headpieces are generally more complex, often involve creative folding, and can be too difficult for young children. However, the simplest headpieces are fish and fish-like animals (e.g., dolphins, sea lions). If you decide to create headpieces, use light weight paper to create your first pattern. This way, you can easily fold, refold, snip, construct (working out any bugs), and finally take the pattern apart again to make your perfected pattern pieces on a stiffer poster board.
Methods- Three suggested methods for making paper headpieces:
Cut two identical pieces, large enough to fit the students' heads. Staple them together across the front, top and back, leaving the bottom open to slip over the head. You may want to punch holes and add yarn for tying under the chin.
Fold a large piece in half. Staple the piece at the front, punch holes, and add yarn to tie under the chin. A "dart fold" (ask someone who sews if you don't know this term) just in front of the child's ears often makes this headpiece work to its full potential.
Create a hat-like "box" for the base of the piece and the animal's body, to which you can add a head and appendages. Or make a wide band to wrap around the head, around which you build the headpiece/animal. These methods create a more three-dimensional animal than other paper methods. These pieces can become quite a construction job and would best be taken on by older students, but once achieved, they can be awe inspiring masterpieces!